07740 877 544
Artwork Setup

This guide is for creatives and explains why artwork setup for signmaking is necessary, as well as how you can do it. Follow the process to create production-ready images of any size for all types of signage and display graphics.
What is artwork setup for signmaking?
Artwork refers to an image or batch of images created for reproduction in the form of a sign or display graphic. Your artwork medium can include painting, illustration, photographs, scanned drawings, computer aided graphic design and compositions.
Setup is a necessary process to reproduce artwork for any signage at any size. Also known as pre-press production, artwork setup enables smooth workflow and prepares your image for accurate manufacture.
Understanding how to set up your artwork for signmaking ensures the image quality you expect from your finished product. Digital artwork setup also involves managing large file memory sizes. The setup process minimises potential artwork revisions, saving you time, frustration and expense.
Graphics professionals such as signmakers, printers and engravers prepare artwork differently for various end products. Ask for their artwork setup instructions before you begin your project.
Artwork setup for signmaking checklist
Please follow this process before sending your artwork files to me:
- Detail the objectives of your project
- Include approximate dimensions, quantity, finish, example images and photographs of the sign/display and location/surface if available.
- Provide brand guidelines if available.
- Confirm colour references if available.
- Provide vector artwork when possible.
- Convert vector strokes to objects.
- Weld/melt all overlapping vector objects.
- Embed CMYK values into vector artwork for digital printing.
- Before creating raster/bitmap images, set the colour mode as CMYK.
- Before creating raster/bitmap images, ensure the resolution is adequate for your end product.
- For wide format printed graphics (eg: > 2m by 2m), set the resolution at a manageable file memory size.
- Create vector and raster/bitmap images at full scale if your artwork file size is manageable.
- Create raster/bitmap images at a scale of 1:2, 1:4, 1:10, etc. until your artwork file size is manageable (< 50Mb when possible).
- Flatten final artwork files containing layers.
- Include artwork bleed as described later in this article.
- Do not include crop marks or registration marks.
- Name each file with relevant reference to artwork.
- Compress artwork file memory size.
- Use WeTransfer, Dropbox or similar link transfers when sending large memory files.
- Include accompanying font files whenever available.
Contact me for advice at any stage during your artwork setup process.
Where to begin with artwork setup
Stage one begins with the understanding of how to make your end product.
Contact your sign or display graphics manufacturer if you don’t know how your end product will be made, especially for accurate replication of high resolution photographs, specific colours or atypical finishes such as fluorescent and mirror reflective.
In stage two, assess how you’ll convert your artwork for production. Digital formats are required for computer aided signmaking, such as cutting and printing self adhesive vinyl, as well as CNC machining and engraving.
Digital artwork can also be supplied for hand painting, as well as scaled drawings. You can also provide scaled, hand drawn images transferred onto transparent acetate for signwriting.
Stage three involves detailing information for your sign or display graphics manufacturer. Describe your ideas and explain dimensions, finish (gloss, satin, matt, reflective, etc.), quantity, and surface or location where your end product will be. This’ll ensure the closest practical output you envisage for your finished product.
Vector artwork for signmaking
Vector graphics are geometric shapes comprised of coordinates (nodes) and linear paths. The shapes contain digital data.
Graphic design software is used to create 2D and 3D vector graphics for making a range of signs and displays. Vinyl lettering, 3D shapes and laser engraving are only a few machine-made products enabled by vector graphics.
Think of a square. Each corner is a moveable node. Paths connecting each node can be altered to change the shape of the square. Nodes can be added to lines to create angles and curves. Separate vector shapes can be added to make letterforms and complex illustrations.
Creating precise artwork with vectors benefits the ability for infinite scaling without loss of quality. Generally, vector data files also contain significantly less memory than a bitmap/raster (made of pixels), enabling smoother and faster workflow.
Vector graphics can also be printed to ensure the sharpest output quality for your artwork. Additionally, both vector and bitmap/raster graphics can be combined in a single piece of artwork.
Converting vector strokes to outlines
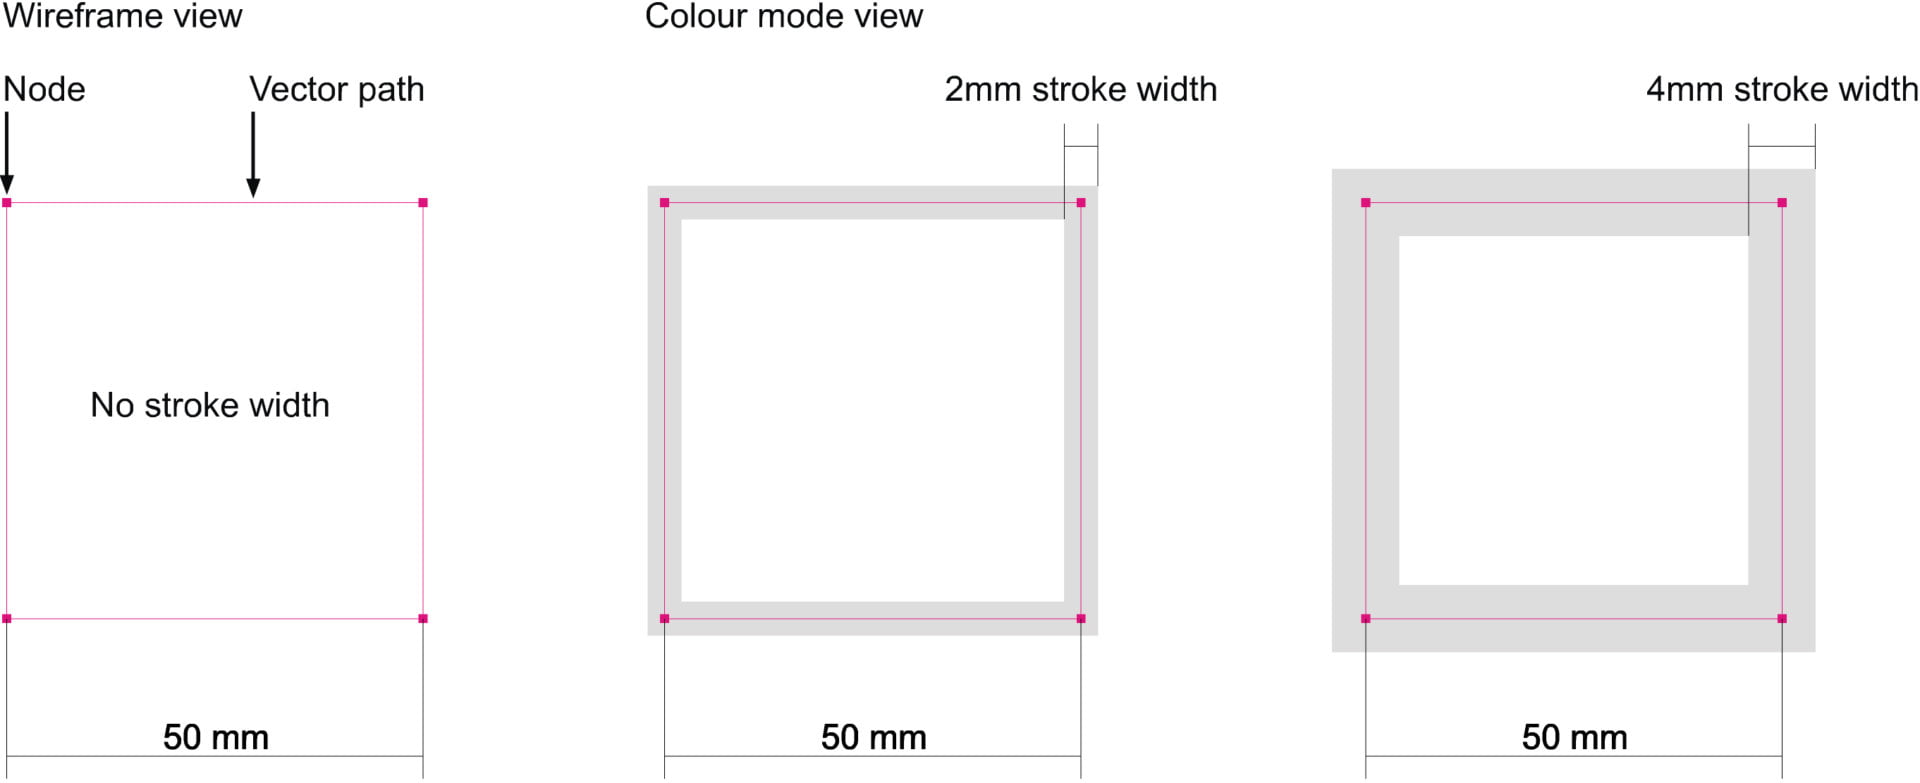
As shown in the image above, lines connect one node to another to create a vector shape.
Vector lines viewed in their transparent/non-colour state (also known as wireframes) do not have a default thickness. The lines are paths connecting one node to another. The thickness of vector wireframe paths cannot be adjusted. When viewing vector paths and shapes in colour mode on your design software, vector paths can be made thicker. This setting is called stroke width.
In graphic design software, increasing or expanding the stroke width of a vector line does not increase the thickness of the vector path. The change in thickness only exists when viewing in colour mode. Therefore, the width of the coloured stroke must be outlined with vector hairlines to increase the thickness of the line.
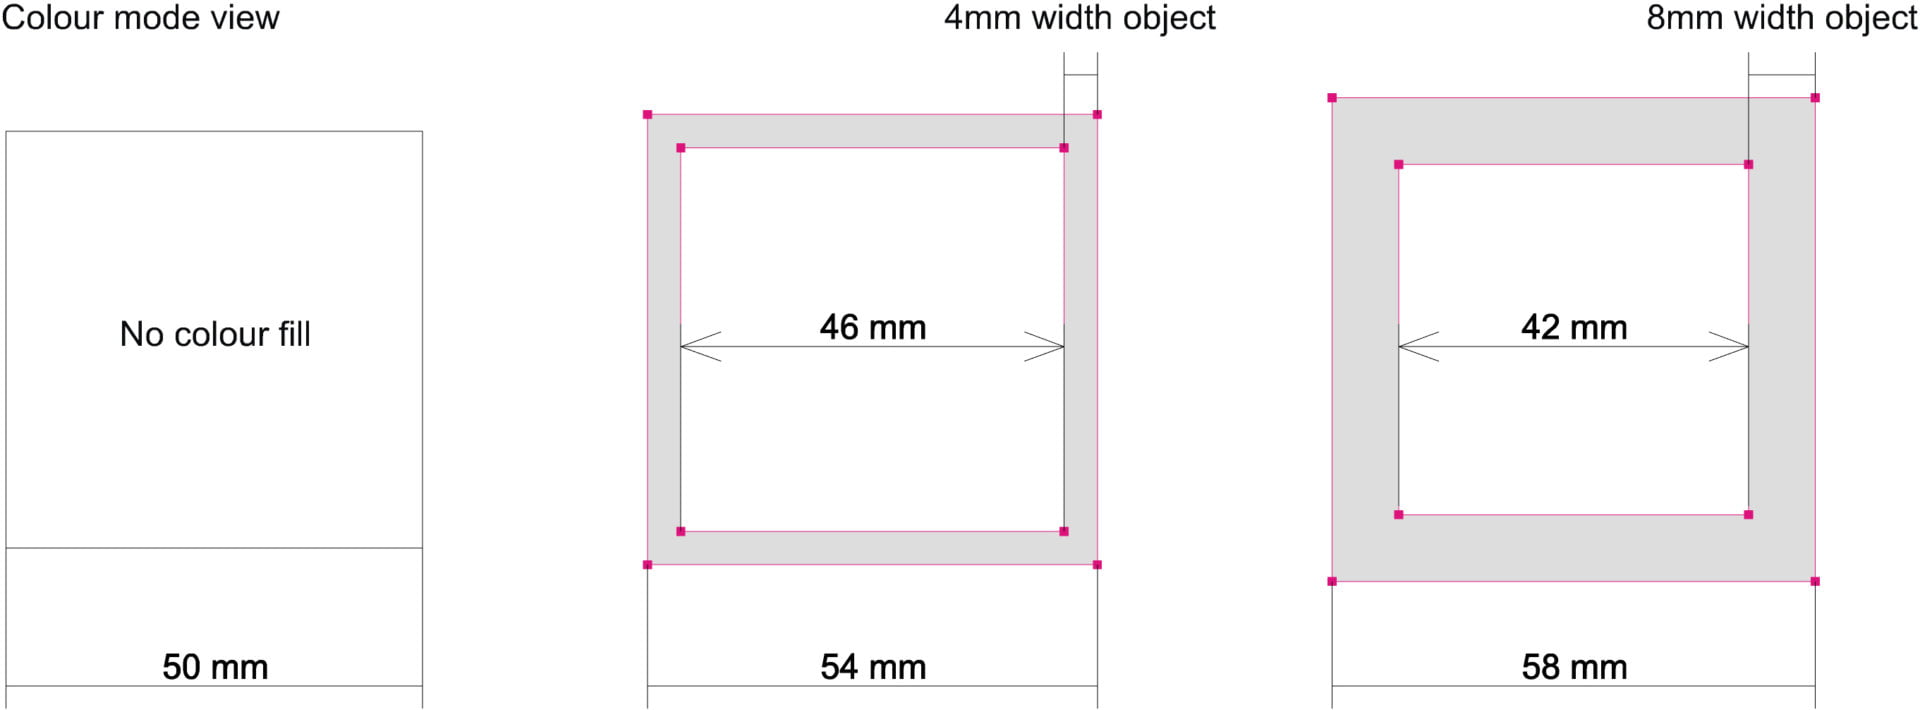
This action is called converting strokes to outlines or converting lines to objects.
Artwork containing coloured strokes is merely wireframe skeletons fattened with colour. Converting strokes to outlines is necessary for sending the path coordinates to any machine receiving vector data. The path data enables the production of signs such as cutting vinyl and machine routering substrate shapes.
When practical, create vector graphics as outlined shapes – not skeletal lines.
Stroke widths can be printed dependent on the printing process. Check and ask your printer for sample portions of printed graphics when complex artwork is too labour intensive for converting to outlines.
It’s also good practice to convert all editable fonts to curves. This action disables live editing text for importing into other applications as vector objects. Software applications which don’t have the specific font installed won’t then replace that font with another.
Bitmap/raster artwork for signmaking
A bitmap image is the same as a raster image, comprised of pixels. A pixel is a coloured square or dot on a grid. In its totality, the grid of pixels creates the image.
The number of pixels per square inch of print: ppi = pixels per inch. More pixels mean a sharper quality image for print output. Generally, increasing the number of pixels in an existing image doesn’t always yield improved quality images.
It’s important to specify the pixel count of an image before you begin creating digital artwork. Pixel count can be specified in artboard settings on your graphic design software. Some cameras also have settings to choose the number of pixels.
Finding a balance between image quality and smooth file processing begins with the resolution settings.
Typically, more pixels will result in larger memory sizes of artwork files. More pixels means better quality print output but larger file sizes. The ease of managing workflow and memory size will depend on the processing capabilities of your image hardware and software, in addition to the quality of print output you expect.
Keep in mind, high ppi doesn’t necessarily benefit small print output, such as postcard size, especially when the file memory size is a struggle to process.
Dots per inch for printed signs
Dots per inch (dpi) is similar to ppi and relevant to the print hardware printing your image. More printed dots per inch will result in a less pixelated image. The number of printed dots per inch in an image is referred to as resolution.
Selecting adequate print resolution for your artwork will depend on the finished size of your image, in addition to the distance it will be viewed at. For example, a roadside billboard is viewed at medium to long distances and usually printed at 15-30dpi.
Bear in mind, increasing dpi in an image increases the file memory size – not necessarily the image quality.
180-300 dpi should be ample for printing signs and display graphics. When in doubt, ask your sign or display graphics manufacturer for samples of printed images. Or ask for a sample portion of your full scaled image.
Product size and artwork scale
If your artwork is intended for display on vehicles, shaped or dimensional surfaces, be aware of the artwork bleed explained towards the end of this article.
Determine the maximum overall size or approximate dimensions of your finished product. The finished size (excluding bleed) will influence how to set up your artwork. When practical, create your artwork at full scale (1:1).
Artwork size, artwork scale, or resolution settings are too large if your computer is struggling to process and save images. Or your hardware needs upgrading. In turn, excessively large file memory size will hinder efficient workflow.
Therefore, create digital artwork at a sensible scale. For example, one 2m by 2m digital artwork can reduce to a scale of 1:4 (25% scale). The artboard will convert to a working size of 500mm by 500mm, thus reducing the processing time for most graphic design applications.
Ensure your ppi/dpi settings are synchronised with the scale you’re increasing your finished artwork to.
Scanning and photographing artwork
Create hand drawings, paintings and other non-digital artworks at a size you’re comfortable with. Reproducing your artwork for printed signs and display graphics can then be scanned or photographed.
Scanning or photographing images up to 300dpi is ample for large format print.
Follow this easy method to check the print output quality for scanned or photographed images destined for large format print:
- First, scan or photograph your image at approximately 180dpi.
- Import the scanned image into your graphic design software.
- Scale the image to the end product’s finished size.
- Now crop a portion of the scaled, scanned image into a 100mm by 100mm square.
- Zoom into your 100mm portion until it appears approximately 100mm in height on your display monitor.
- Scan again with an increased dpi, If the image appears pixelated or you’re unsatisfied with the quality.
Managing artwork file memory size
Keep your end product in mind. Think of the viewing distance and the image quality you expect. Viewing bitmaps with high (ppi) resolution on your display monitor for a billboard sized graphic will result in a huge artwork file memory size.
Editing artwork files (bitmaps in particular) with a large memory size in design software will absorb your time. As well as posing challenges for the processing capabilities in your hardware. The scale and number of layers in your artwork will also directly affect the file memory size.
Resolution settings can be altered to reduce file memory size. You can also decrease the scale of the artwork you’re editing. In turn, memory size will be reduced and computer processing speed will increase.
Test resolution settings of bitmaps before creating your artboard and scaled creative piece. Follow the process described in the paragraph above. These tests will result in adequate settings for balancing image quality and smooth workflow.
Artwork filetypes
Flatten Photoshop files (.psd) before exporting and sending to your sign or display graphics manufacturer. Remember to save a copy with layers before flattening your artwork.
Generally, .psd files are converted before digital print reproduction. The same applies to scanned images such as TIFFs. Refer to instructions of file types accepted by your sign or display graphics manufacturer. Online tools make file conversion easier. Visit here to convert your file types.
High resolution Jpegs are common file types used for digital printing bitmap images. When you’re satisfied with the on screen resolution settings, proceed with exporting artwork as 300dpi Jpegs.
Compressing the memory size of final artwork files also increases the speed of workflow. Bitmaps can be reduced in file memory size by using online tools such as Sqoosh. An alternative, powerful file compression tool is website planet. This site accepts files up to 50Mb. Take care not to decrease the quality of your image before downloading your reduced memory file.
Export vector artwork files as EPS, PDF and AI at manageable file memory size. Embed CMYK values into artwork colours for digital printing vector artwork.
Learn more about file types here.
Beware of colour matching challenges, such as spot colours when exporting and converting file types. Print samples are recommended, especially for large format and multiple quantity prints.
Artwork colour
I’ve written extensively about colour management in signmaking. From how we perceive colours and finishes on signmaking materials to their different production methods. Information is abundant in three articles.
The main takeaways are:
- Provide colour references with your artwork.
- Accept every colour and finish cannot be accurately replicated on every media.
- Determine how critical exact colour matching is for your project.
Learn more by visiting these pages:
Managing colour for signmaking
Colour production in signmaking
Artwork fonts
Font matching can be challenging with tens of thousands of digital fonts (and continually growing). Always note the source when choosing digital typefaces or fonts for use in your artwork.
Read and understand the licensing agreement. Not all fonts are free for commercial use. Beware of copyright law.
Include Opentype files if available to accompany your artwork files. Stipulate any alternate characters, ligatures or modified letterforms used within your artwork.
Convert the text to curves.
When possible, choose a vector design software application to type small paragraphs of text. Do not use photo editing software for creating text destined for vinyl cutting. Although some Photoshop PDFs containing text can be converted to vectors, it’s best to create text as vectors.
Software applications are prone to distort very small text when imported from other software.
Distortion can happen due to the scale you’ve created your text and is prevalent when typing text at small sizes (< 3mm height) in programs such as Adobe InDesign. Prevent distortion by creating vector text at a 1:1 scale (when larger than 3mm height) or increase the scale for a reduction in your recipient’s software programme.
Provide a backup Word document or similar text document with copy/paste ability when sending large paragraphs of text for reproduction as cut vinyl. The backup file will prevent the signmaker from re-typing all of the text in the event of distortion. Remember to provide the font file(s), dimensions and artwork example. When type formatting is essential, discuss the editing with your signmaker and ask for a proof.
Artwork content copyright
Beware of image copyright when including second hand content in your artwork. Permission is often legally necessary for borrowed photographs, illustrations and digital images.
Many websites provide royalty free photographs, vector illustrations and icons, amongst other useful graphic design products. Attribution is sometimes required, so check with the owner.
Visit here for an extensive list of free graphic design resources.
There are also websites where you can purchase countless photographs, vector graphics and elements to use in your artwork. Envato and Shutterstock are good places to begin your search.
Artwork bleed and safe zone
When elements of your artwork meet the edge of your artboard, a bleed is often necessary for pre-press production. Do not crop coloured backgrounds, type and images, or any other element touching the perimeter of your artwork.
The bleed acts as a zone of tolerance for the finished size of your product, as does a safe zone. For example, 3mm bleed and 5mm safe zone are standard for printed paper stationery artwork. The bleed or safe zone compensates if the guillotine is 1mm off when cutting stationery to size.
Artwork bleed differs significantly dependent on the product. Ask your graphics professional for your sign or display graphics size of bleed.
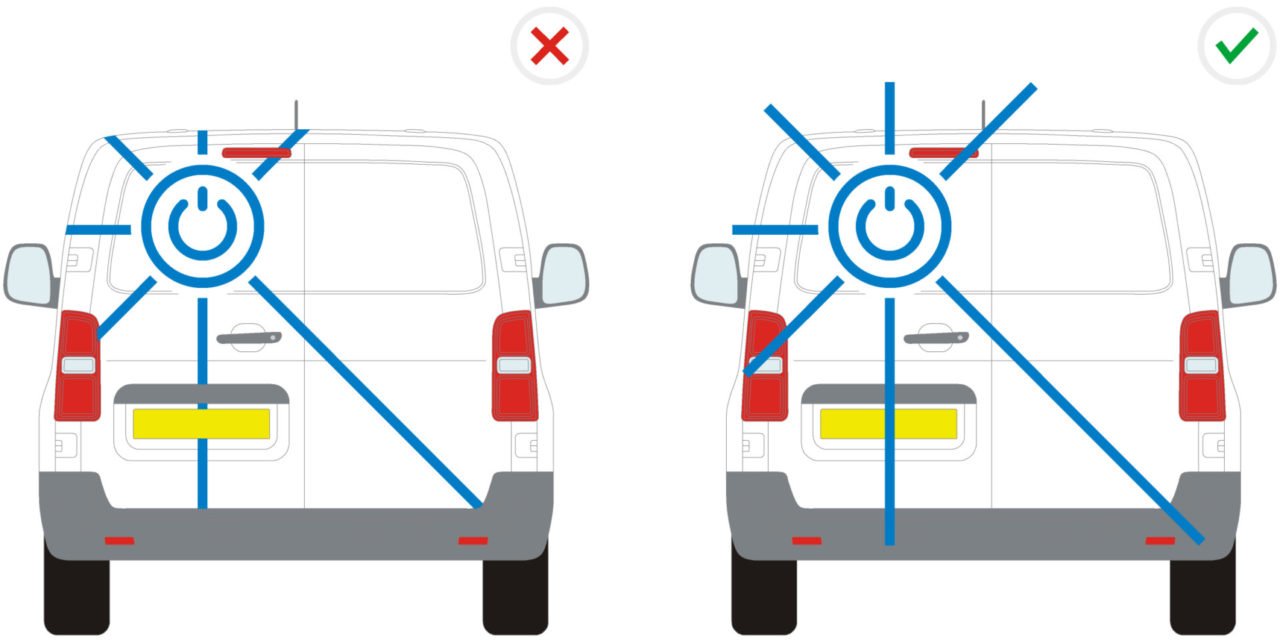
Designing vehicle graphics on two dimensional layouts may not provide accurate sizes for your artwork elements. Some panel areas are convexed or recessed and add more area. Similarly, graphics applied onto the roof or around the vehicle will be relevantly larger than the two dimensional layout you’re designing.
Artwork bleed also allows your signmaker to crop your artwork for handling vehicle graphics, wrapping panel edges, or hemming banner edges.
Visit here to learn more about creating artwork for vehicle graphics.
Creating artwork for hand painting
Wireframe outlines work best for transferring scaled patterns to hand letter or filling in with paint. Therefore, create digital artwork as vectors or print your artwork onto transparent acetate.
Artwork printed on transparent acetate can be enlarged with an overhead projector and drawn to scale. Occasionally, large hand lettering pieces such as murals are drawn directly onto the surface. Scaled drawings are necessary for a close match to your artwork.
Provide paint colour references whenever possible. Contact your local signwriter to discuss gold and metal leaf.
Summary
Planning your artwork before beginning your creation will minimise artwork editing. Seeking advice about available materials, colour, finish, durability, and cost will also save time for you and your sign or display manufacturer. Discussing your concept and researching can spark new ideas and opportunities for future projects.
Want to know more about artwork setup for signmaking? Get in touch to discuss your project.