07740 877 544
Estimated reading time: 12 minutes
If you’re a novice sign painter or would like to improve your brush painting techniques, this guide is for you. You’ll learn an easy to follow method for how to paint a sign panel with a brush. This will yield a neat finish for a durable exterior sign. Follow the step by step instructions and photos describing each stage of the process.
Why is painting a sign panel properly, so important?
Achieving a smooth, painted finish on a panel is necessary for lettering a good looking sign. Whether the panel is made from plywood, hardwood, softwood, MDF, metal, plastic, or any other material, a clean and durable finish will help make the sign appealing. Avoiding any debris under the paint or visible brush marks makes the sign look professionally painted. It’s also important to understand the thorough preparation of a painted panel to ensure that it can last in exterior conditions.
Sign painting materials
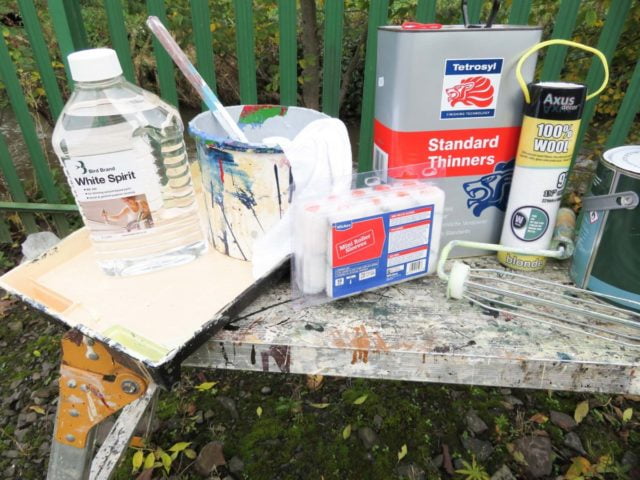
In most circumstances, materials required for painting sign panels by hand with a brush are:
• Your panel
• Primers, undercoats, and top coats
• Thinners and brush cleaners
• Clean paintbrushes with the bristles intact
• Paint pots, stirrers, lint-free cloths
• 180 or 320 grit sandpaper
• A dusting brush (or air blower)
• Sawhorses, trestles, or flat surface to place your panel on
Choosing the correct paints depends on the substrate, purpose, and finish of the sign. Understanding the paints which are available also helps ensure the sign will last indoors and out, without rapid paint cracking or peeling. This can be a long learning curve but following this guide will help you to understand the basic principles. Ask advice from your local paint merchant too.
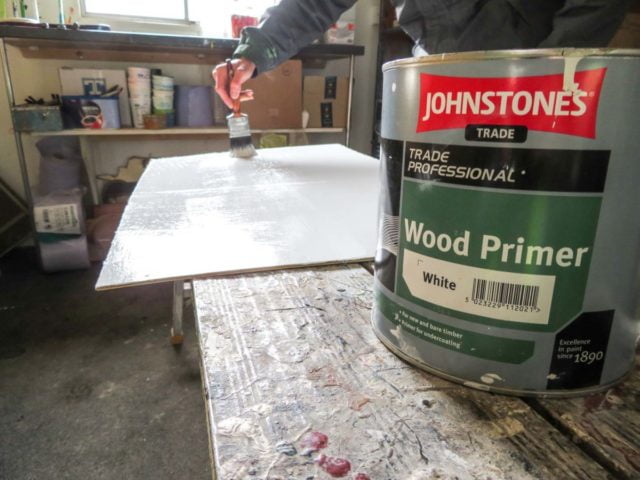
When painting onto bare, untreated surfaces, it’s wise to use a suitable primer to start with as a base coat and aid as a sealer. Each substrate will have a specific primer and it’s important to use the correct one.
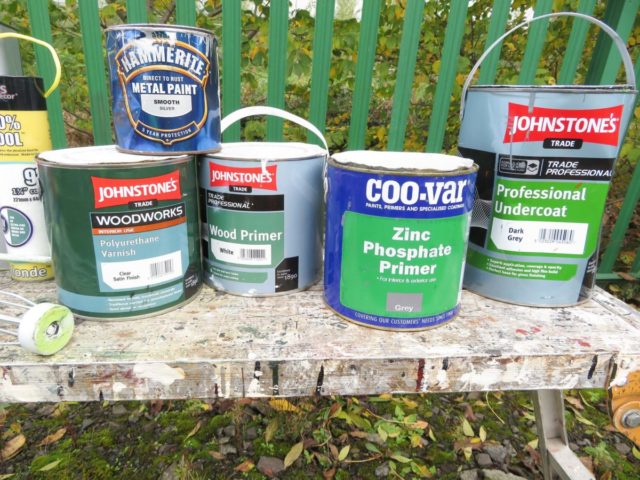
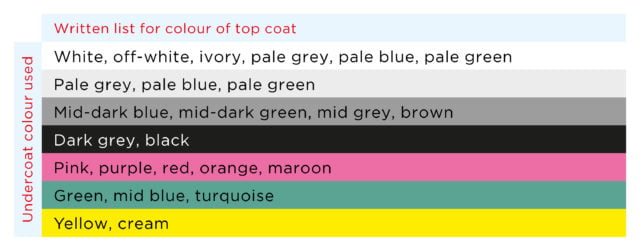
Once your primer is applied, dry, and cured, an undercoat will help before top coating. The undercoat provides a base colour to help the top coat’s coverage, as well as providing a fuller bodied finish. Some primers serve as undercoats and some top coats require no base coats beneath. When required and wherever available, always try to match the undercoat colour as close as possible to the top coat colour. You can determine the undercoat colour by referring to this guide:
The necessity of sanding
No matter how smooth your panel is, it’s always advantageous to sand the panel before the painting process, as well as between coats. When using a fine (320) or medium (180) abrasive sandpaper, the sanding of the surface scores the substrate. This scoring ensures that the coating does not dry and cure in one thin, level layer. The coating bites into the abraded surface and aids adhesion.
By repeating the sanding before painting between coats, any dust or particles which have landed on your wet paint will be smoothened away. Reduce the abrasiveness of the sandpaper nearer the final top coat as too harsh sanding will shine through your paint. Judge whether a final sanding is necessary before your last top coat by checking how dense the top coat paint dries.
Try to sand the panel away from the painting area to reduce dust in the atmosphere. Use a dusting brush, a mechanised air blower, a tack rag (a sticky cloth available from auto body supplies), or use a damp cloth to collect the sanded particles.
The painting environment
If you have access to a dust free environment, it is best to paint your panel in there. You may choose to place protective floor coverings underneath the painting area to avoid any likely paint drips or spillages. Alternatively, if you’re outside and it is sensible, spray some water on the ground under and around where you are painting. The water helps prevent dust from rising into the atmosphere when you are moving around the painting area.
A raised flat surface like a table top or sawhorses/trestles is also helpful. By positioning your panel at a comfortable height, your back, neck, and arms aren’t straining to reach down. Painting panels quickly and methodically can be energetic, so ensure that the painting area is free from any obstructions or hazards.
Try to wipe any dust or contaminants off of the panel before bringing it into the painting environment. Dust or debris on the panel will be dragged into your paint which is likely to cause problems when you begin painting or shine through the lettering or images on the finished sign. Placing the panel horizontally on top of your paint surface is the safest and easiest way to paint the panel.
Paints can take a considerable time to dry before handling or overcoating. Plan the number of coats expected and think ahead. Be aware of how long the painting environment may be set up. Most paint manufacturers state the expected drying and overcoating times on the paint’s directions for use documents or labels. Generally; reds, oranges, maroons, and yellows may take several top coats for the colour to be dense and not transparent.
The paint preparation
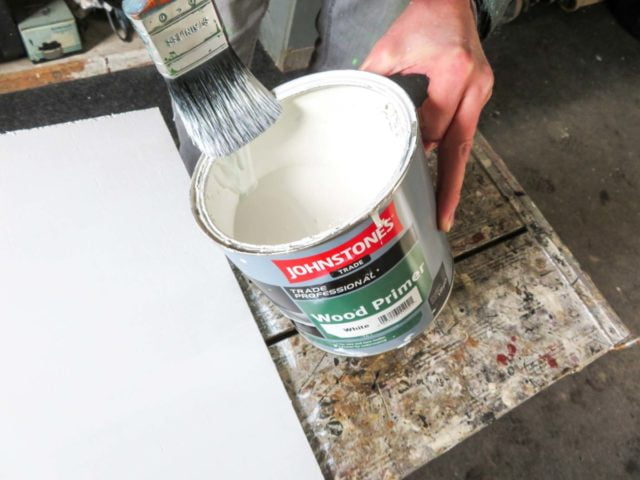
Now that your working environment is set up and the panel is dust free and in place, you can prepare your paint. Most paints (especially oil based) require stirring before applying. Stirring the paint mixes the oils or pigments with the carrier liquid, so always read the label on the tin or ask your paint merchant for advice. The handle of a wooden spoon is a good example of the type of stirrer you can use.
Some paints may require thinning too. Depending on whether you are using oil based or water based, the relevant thinner will be required for easier, flowing brush work. Paint that is too thick will dry quicker when brushing and is much harder to work with. It will also leave your painted panel looking bumpy and uneven.
Carefully pour your paint into a clean pot or container and add a very little quantity of thinner (5-10% ratio to the paint volume). Begin by gently stirring with a suitable stirrer. The ideal consistency for paint brushed by hand is like double cream. If the paint still feels too thick when stirring, repeat the thinning formula process until the consistency is easy to stir. If you feel like you have to put strain or effort into stirring the paint, then it is likely too thick for brushing.
Some specialist primers require consistency like water, so be aware of what the paint’s directions for use state. If the paint in the tin is naturally very thin (like milk or water), don’t thin it. Take extra care when handling or loading your paintbrush with thin paints as it will splatter everywhere if moved around too fast. You may choose to wear eye protection when using paints, especially with thin paints.
The brushing process
First and foremost, always have a clean cloth on your person. Get into the habit of carrying a cloth in your pocket when painting, as it’s much quicker and safer to wipe any unforeseen drips, splatters, or spillages.
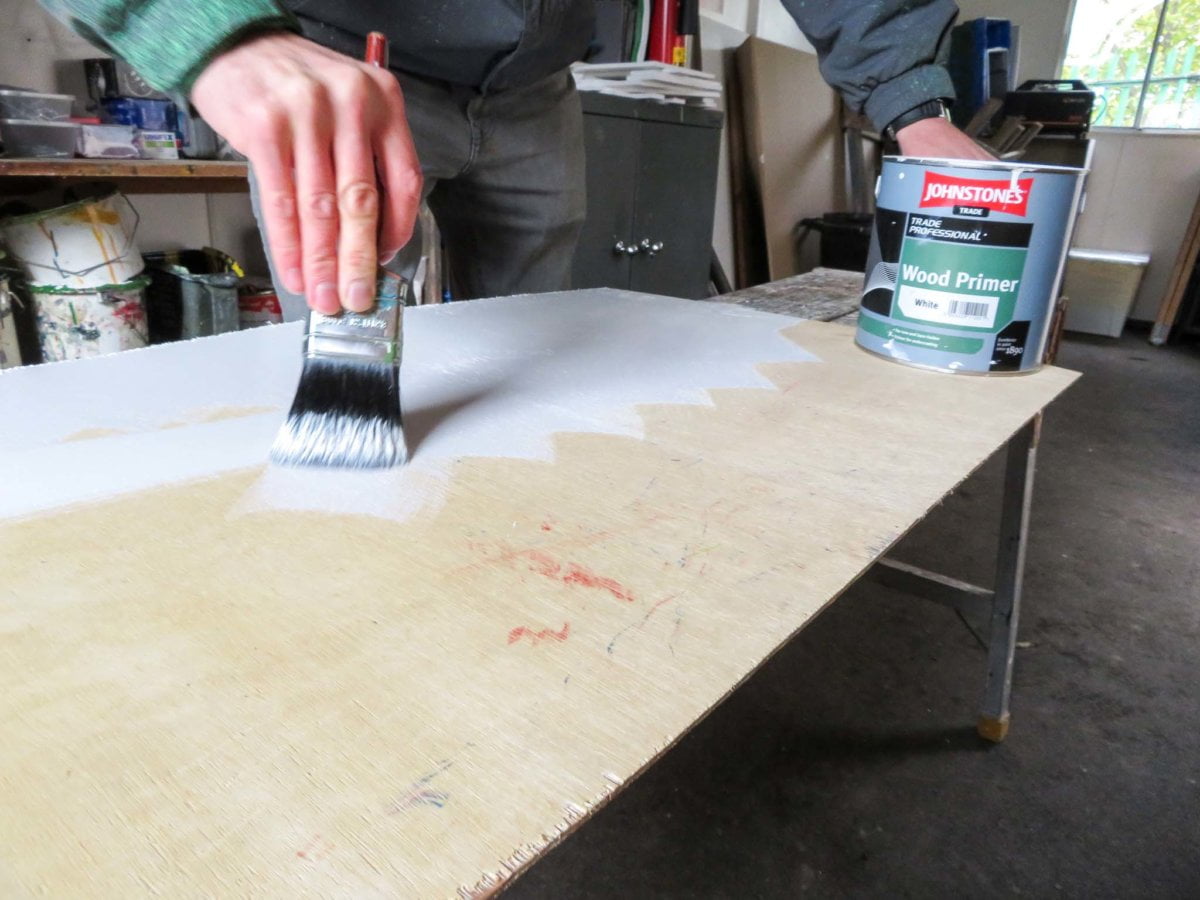
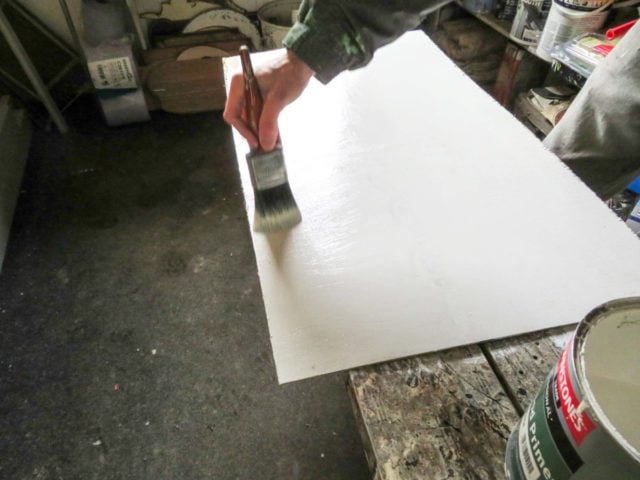
Choose a clean, dry, and unscathed brush large enough you can confidently handle. The bristles should be pliable and intact – not stiff and falling apart. Begin by loading your brush with the paint from your pot. Then, with a generous amount of paint held within your brush’s bristles, stroke the brush against the panel in a straight line. Start at the edge – not in the middle of the panel. If the panel is elliptically shaped or irregular, plan where your painting route will take you.
Your objective is to keep a wet edge. This means that you’re always painting from the segment of the panel that you have painted previously. Do not start painting one edge, then paint other edges to then leave the middle as the last segment to paint. Divide the panel into manageable areas which you can swiftly coat the paint onto, and finish each area before you begin to paint another area.

Once the paint is spread out in a single long line, criss-cross the straight painted line, spreading the painted line outwards and diagonally.
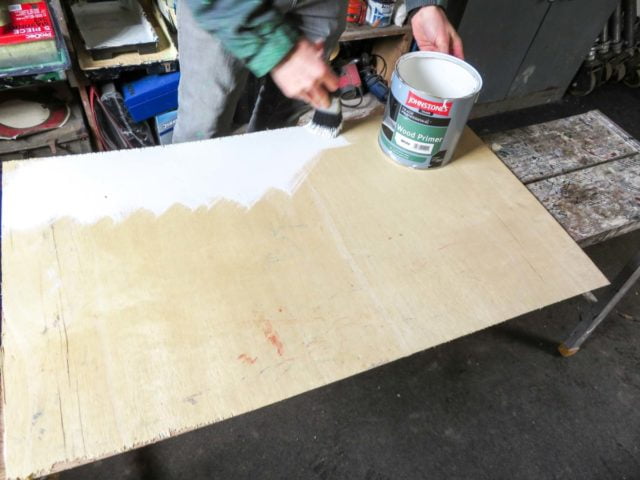
Working quickly, overlap your brush strokes and continue to spread the area until it is covered. You should begin to feel that the brush is lacking paint.
Don’t fret if the coat of paint is not solid and you can see through it. Most paints require several coats and the multiple layers of paint will protect your substrate better andlonger.
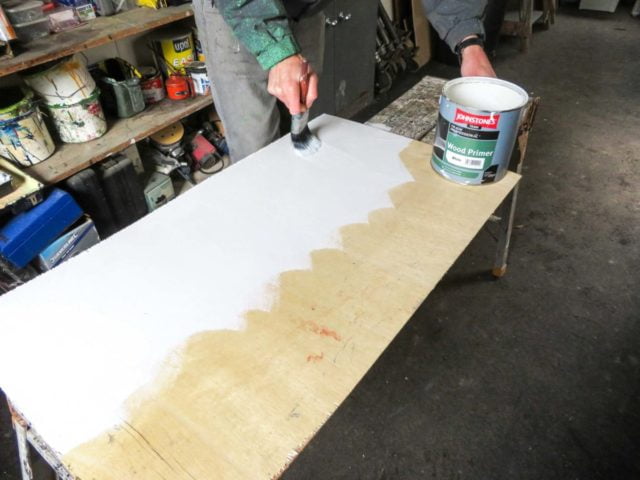
The finishing process
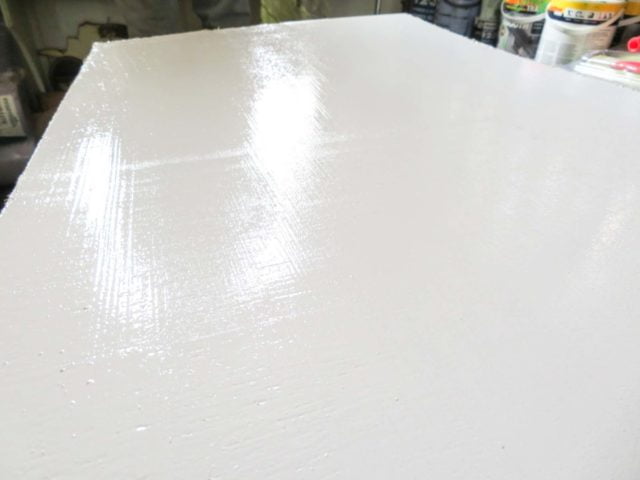
Now that the area is evenly covered by spreading the paint, finish neatly with long brush strokes. You can choose to go with or against the woodgrain if painting on timber products. The full coverage of paint will depend on the closeness of the grain.
Personally, I prefer to finish the brush strokes of paint in the same orientation as the panel. So, if the panel measures two metres in length by one metre in height, I’ll finish the brush strokes vertically on the one metre width. Your decision is not vital and the better you become at painting, the fewer brush strokes you’ll notice.
Now that the first area has been adequately covered and brush finished neatly, wipe the excess paint from off of your brush. Use the side of the tin or pot to remove the paint which you’ve picked up from finishing the first area.
Now repeat the brushing and finishing process on each divided area of the panel. Always remember to keep a wet edge on the panel’s face.
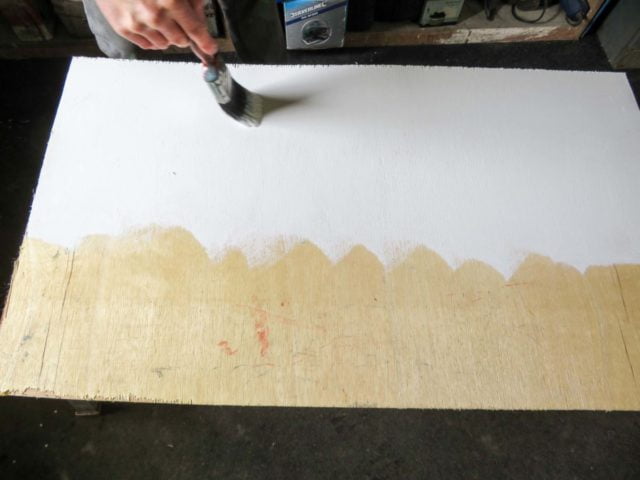
Using the tip of your brush, lightly paint the panel edges as you work around the panel face. Upturn your brush and swipe it along the opposite side of the panel which is facing downwards. This will collect any dripping paint on the panel edges.
Once completely painted, your panel should look evenly coated and neatly finished.
The cleaning process
Look after your tools by cleaning the brushes thoroughly.
Washed and dried aluminium or plastic containers (like the ones you get soup in) make ideal brush cleaning vessels for oil based paints. Pour the brush cleaning liquid into the containers and dip your brush into it. Then wring the brush up and down in the container by pushing off and on the handle. You’ll see the paint eventually come out of the bristles, the more you wring the brush. Once all of the paint is off of the bristles, dry the brush as much as you can by squeezing the excess liquid back into the container.
You don’t have to use your hands for this – just keep rubbing the bristles against the inside of the container (just like wiping the excess paint back into the paint pot). Use a paint-free cloth to dry the brush’s bristles then air dry in a well ventilated area.
If you’re using oil based paints regularly, a worthwhile investment would be a brush storage unit. These help keep the brushes’ bristles supple and prevent them from stiffening.
Also, remember to wipe your paint stirrer and allow the pots to dry before using them again. Always discard the waste chemicals safely – never pour oil based paints or derivatives down the drains.
Brush or roller?
You can also paint using a roller which will leave a smoother finish. This method is also ideal for large areas and painting quickly. Following a similar process to painting with a brush, maintaining a wet edge is essential. As well as neatly finishing the strokes (or in roller terms, swipes).
However, when using oil based paints, frequent replacement of roller pads is necessary. The paint on the roller pad will harden, preventing repeated use of the roller pad. Cleaning the oils from the roller is too messy for the effort involved. There is also additional cleaning involved with roller trays and the rollers aren’t ideal for smaller panels, edges, or awkward shapes.
If you choose to use water based paints, you can always clean the roller pads and store them tightly in a sealed bag or container. This helps prevent air from drying the roller pad and ensures you can re-use. Again, this can be messy and time consuming. You can decide on the advantages of each painting method dependant on your project.
Key points
- Choose compatible paints for the substrate
- Ensure dust and debris is kept to a minimum
- Thin the paints if necessary
- Plan and divide the painting segments of the panel
- Always keep a wet edge and work fast
- Finish the spreading of your brush strokes by long neat strokes
- Clean your brushes and store them correctly
Thanks for reading.